Api 速通
只整理常用的功能,可能会有一些遗漏,不过应该能够应付大多数日常开发场景。
约定规范
IMPORTANT
默认的测试发现规则是 从项目根目录,查找
test_*.py和*_test.py文件,然后Test开头的类以及test_开头的方法。conftest.py是通用fixture声明的地方,该文件名是约定俗成的,pytest会自动导入该文件中的fixture。caplog是pytest提供的fixture,用于获取日志信息
def test_case_01(caplog):
return caplog全局变量下的 pytest.mark.parametrize 变量名必须叫 pytestmark。
pytestmark = pytest.mark.parametrize('exec, expected', [
    ('2*3', 6),
    ('3*3', 9)
])Fixture
使用 @pytest.fixture 装饰的函数,被称为装置。支持作用域、参数化、自动注入、测试前置和后置操作、复写以及参数化中个性配置。
# 作用域和自动注入
@pytest.fixture(scope="session", autouse=True)
def fixture_name():
    pass

# 测试前置和后置操作
@pytest.fixture
def fixture_name():
    print('前置操作')
    yield
    print('后置操作')

# 参数化
@pytest.fixture(params=[1, 2, 3])
def fixture_name(request):
    return request.param

# 参数化中的个性配置
# 针对某一个参数使用 mark 进行标记,单个或者多个
@pytest.fixture(params=[1, 2, pytest.param(3, marks=pytest.mark.skip)])
def fixture_name(request):
return request.paramusefixtures
默认情况下要使用哪些 fixture 实际上都会在当做参数传递到测试用例中。比如这样
@pytest.fixture
def data_fixture():
    print('test staring...')
    yield 'test data'
    print('test ending...')

def test_01(data_fixture):
assert data_fixture == 'test data'实际上有些时候,你可能压根用不到 yield 的值,比如他只负责在测试之前创建一个文件,结束之后就要删除文件了。
@pytest.fixture
def data_fixture():
    print('test staring...')
    os.mkdir(os.path.abspath('test_dir'))
    time.sleep(5)
    yield
    os.rmdir(os.path.abspath('test_dir'))
    print('test ending...')

# 此时其实你完全不用关心 yield 的值
# 就可以使用 usefixtures
def test_01(data_fixture):
    assert 1 == 1

# 可以接收任意个 usefixtures("data_fixture", "data_fixture2")
@pytest.mark.usefixtures("data_fixture")
def test_02():
assert 1 == 1至于 usefixture 的执行次数,完全依赖于你使用的 fixture 的 scope。
Mark
准确的说 usefixture 也是在 mark 的范畴内。此外还有一些常用的 mark。
支持跳过用例、标记失败、标记慢用例、标记 xfail 、过滤警告信息。
@pytest.mark.skip(reason='老版本的测试用例,暂时跳过')
def test_case_02():
    assert 1 == 1

@pytest.mark.skipif(condition=True , reason='满足条件就跳过这个用例')
def test_case_03():
    assert 1 in [1]

@pytest.mark.xfail(reason='标记失败')
def test_case_04():
    assert 1 == 2

# 包含 api v1 的警告信息不会出现
@pytest.mark.filterwarnings('ignore: api v1')
def test_case_05():
    warnings.warn(UserWarning('api v1, 这是老的 api 尽快更新到 api v2'))
    return 1

# 1. 参数化接收输入和预期结果
@pytest.mark.parametrize('test_input, expected', [(1, 2), (2, 3)])
def test_case_06(test_input, expected):
    assert test_input + 1 == expected

# 2. 同样可以使用 pytest.param 对参数化的某一项进行标记
@pytest.mark.parametrize('exec, expected', [
    ('2*3', 6),
    ('3*3', 9),
    pytest.param('4*3', 11, marks=pytest.mark.xfail)
])
def test_case_07(exec, expected):
    assert eval(exec) == expected

# 3. 通过 pytestmark 来指定参数化,变量名必须叫 pytestmark
pytestmark = pytest.mark.parametrize('exec, expected', [
    ('2*3', 6),
    ('3*3', 9),
    pytest.param('4*3', 11, marks=pytest.mark.xfail)
])

def test_case_07(exec, expected):
assert eval(exec) == expected日志管理
pytest 默认捕获 WARNING 级别的日志并且会记录模块、行号、日志级别和消息
import logging

log = logging.getLogger(__name__)

def get_api_data():
    log.warning("get api data warning...")
    return "api data"

def test_case_01():
assert get_api_data() == "api dataxx"当用例执行错误时,会显示如下信息。
src/tests/test_case_01.py:11: AssertionError
---------------------------------------------------------- Captured log call -----------------------------------------------------------
注意:信息在这里
WARNING  test_case_01:test_case_01.py:7 get api data warning...
======================================================= short test summary info ========================================================
FAILED src/tests/test_case_01.py::test_case_01 - AssertionError: assert 'api data' == 'api dataxx'
========================================================== 1 failed in 0.03s ===========================================================在执行的时候,可以指定输出时间格式。当然这些也可以通过配置文件进行配置
pytest --log-format="%(asctime)s %(levelname)s %(message)s" \
--log-date-format="%Y-%m-%d %H:%M:%S"src/tests/test_case_01.py:11: AssertionError
---------------------------------------------------------- Captured log call -----------------------------------------------------------
注意:增加了时间的显示
2025-09-15 22:20:37 WARNING get api data warning...
======================================================= short test summary info ========================================================
FAILED src/tests/test_case_01.py::test_case_01 - AssertionError: assert 'api data' == 'api dataxx'
========================================================== 1 failed in 0.03s ===========================================================也可以通过 --show-capture=no 来关闭日志的输出。也可以通过 --log-disable= 指定测试用例名字禁止输出日志。
在 pytest 中提供了一个全局的 fixture 名为 caplog 它可以获取日志的信息,也可以临时的修改捕获日志的级别。
import logging

def get_api_data():
    log.debug('get api data debug...')
    log.warning("get api data warning...")
    log.error("get api data error...")
    return "api data"

# 此时执行的时候就可以捕获到三条日志
def test_case_01(caplog):
caplog.set_level(logging.DEBUG)可以根据日志的返回信息进行断言。虽然我也不知道怎么用,或许是记录到文件之后才能打印出来吧。
def test_case_01(caplog):
    # * caplog.messages        -> 日志消息列表
    # * caplog.text            -> 日志文本信息
    # * caplog.records         -> logging.LogRecord 格式的日志列表
    # * caplog.record_tuples   -> 包含 log level name 和 message 的元组列表
# * caplog.clear() -> 清空日志最后通过 --log-file=xx.log 配置日志的生成,但是每次执行用例都会复写之前的 log 文件;此配置同样可以在配置文件中完成。
- 通过
--log-file-mode=a来追加日志。 - 通过
--log-file-level=INFO来指定日志级别。 - 通过
--log-date-format=%Y-%m-%d %H:%M:%S指定输出的时间格式。与--log-file-date-format一样的效果 - 通过
--log-format=%(asctime)s %(levelname)s %(message)s来指定输出的格式。与--log-file-format一样的效果
pytest --log-file=log/test.log --log-file-mode=a配置文件
配置文件可以是 pytest.ini、.pytest.ini 或者是 pyproject.toml 其他的都不推荐。一般存储在项目的根目录中。
# pytest.ini or .pytest.ini
[pytest]
minversion = 6.0
addopts = -ra -q
testpaths =
    tests
    integration

# pyproject.toml
[tool.pytest.ini_options]
minversion = "6.0"
addopts = "-ra -q"
testpaths = [
    "tests",
    "integration",
]日志配置
[pytest]
# 指定日志格式
log_format = %(asctime)s %(levelname)s %(message)s
# 配置日志时间格式
log_date_format = %Y-%m-%d %H:%M:%S
# 指定日志文件
log_file = ./log/test.log
# 追加写入模式
log_file_mode = a
# 记录 log 级别
log_file_level = DEBUG
# 多行日志缩进 True | On 、 False | Off
log_auto_indent=True # 缩进测试发现规则配置
[pytest]
# 正则,结尾包含 Suite 的类作为测试集合。可以是多个,中间加空格
# 默认以 Test 开头的类作为测试集合。
python_classes = *Suite *Test

# 正则,指定哪些文件被视为测试模块。默认 `test_*.py` 和 `*_test.py`
# 可以是多个,也可以是换行
python_files = test_*.py check_*.py example_*.py
python_files =
    test_*.py
    check_*.py
    example_*.py

# 正则,执行哪些测试方法和函数被视为测试用例,可以是多个,中间加空格
# 默认以 test_ 开头的方法为测试用例。
python_functions = *_test

# 设置测试从哪个目录开始执行,默认是项目根目录
testpaths = testing_dir其他常用配置项
[pytest]
# 值会被添加到命令行中,比如 -v 就相当于 pytest -v
# 可以指定多个,中间加空格
addopts = -v --maxfail=2

# 默认目录是 .pytest_cache
cache_dir = .pytest_cache

# 运行测试时,控制台输出的样式,默认是 classic
# 支持 progress count times
console_output_style = classic

# 过滤警告信息,默认情况下所有的警告都会被显示在控制台中
# 可以使用此配置,过滤某些警告不显示
# 与 pytest.mark.filterwarnings 一样的效果
filterwarnings =
    error
    ignore::DeprecationWarning

# 带有 @pytest.mark.xfail 即使成功,默认情况下也将失败
xfail_strict = True

# 建议配置 --strict-markers 使用,代表只能使用已知的标记
addops = --strict-markers
markers =
    slow
serial命令行标识
实际上能够放在配置文件中的配置,也可以通过命令行去执行。只不过比较复杂,写起来很不方便。 参考文档
Allure Report 生成
Allure Report 是一个测试报告生成工具,可以生成漂亮的测试报告。支持各种测试框架。
生成报告需要两步,第一步是安装 allure-pytest 它会帮助你生成测试报告的内容,但是该内容都是 json | txt 可读性不高。
pip install allure-pytest第二步是 allure serve 它会帮助你生成测试报告的界面。需要在当前环境安装,它依赖于 java。
当前以 macOS 为例,当然也支持其他平台。安装文档
brew install allure前期准备
仍然以最小的 todo 项目为例。如果需要 server 代码可以在这里获取 点击获取。
假设你的文件结构如下:
src/
├── tests/
│   ├── conftest.py
│   ├── test_todo.py
│   └── api/
│ └── api_client.pyimport pytest
from api.api_client import TodoAPIClient
@pytest.fixture(scope='session')
def api_client():
""" api 请求"""
client = TodoAPIClient()
yield client
client.session.close()
@pytest.fixture
def get_new_todo(api_client):
res = api_client.create_todo({
'title': "新建的 todo",
'description': "新建的 todo 的描述"
})
yield res
# 后置操作将创建的 todo 删除
try:
api_client.delete_todo_by_id(res.json()['id'])
except Exception:
passimport pytest
import warnings
class TestTodo:
def test_create_todo(self, api_client, get_new_todo):
todo = get_new_todo.json()
assert get_new_todo.status_code == 201
query_todo = api_client.get_todo_by_id(todo['id'])
assert query_todo.json()['id'] == todo['id']
def test_delete_todo(self, api_client, get_new_todo):
todo = get_new_todo.json()
res = api_client.delete_todo_by_id(todo['id'])
assert res.status_code == 200
def test_update_todo(self, api_client, get_new_todo):
todo = get_new_todo.json()
api_client.update_todo_by_id(
todo['id'],
{
'title': '更新 todo',
'description': '更新 todo 描述'
}
)
res = api_client.get_todo_by_id(todo['id'])
assert res.json()['title'] == '更新 todo'
assert res.json()['description'] == '更新 todo 描述'
def test_complete_todo(self, api_client, get_new_todo):
todo = get_new_todo.json()
api_client.change_todo_is_done_by_id(todo['id'], False)
res = api_client.get_todo_by_id(todo['id'])
assert res.json()['completed'] is True
def test_incomplete_todo(self, api_client, get_new_todo):
todo = get_new_todo.json()
api_client.change_todo_is_done_by_id(todo['id'], True)
res = api_client.get_todo_by_id(todo['id'])
assert res.json()['completed'] is False
# 参数化用例
@pytest.mark.parametrize('data, expected', [
({ 'description': '没有 title 的数据' }, { 'error': 'Title is required', 'status_code': 400 }),
({ 'title': '没有 description 的数据' }, { 'error': 'Description cannot be empty', 'status_code': 400 }),
])
def test_create_todo_invalid(self, api_client, data, expected):
res = api_client.create_todo(data)
assert res.json()['error'] == expected['error']
assert res.status_code == expected['status_code']
# 异常用例 -> 跳过
@pytest.mark.skip
def test_todo_skip(self, api_client):
res = api_client.get_todo_list()
assert res.status_code == 200
# 异常用例 -> 标记失败
@pytest.mark.xfail
def test_todo_xfail(self, api_client):
res = api_client.get_todo_list()
assert res.status_code == 200
# 警告用例 -> 调用不存在的方法
def test_todo_warning(self, api_client):
# 没有这个方法在 allure 中会提示警告用例
res = api_client.get_todos()
assert res.status_code == 200
# 错误用例 -> 断言错误
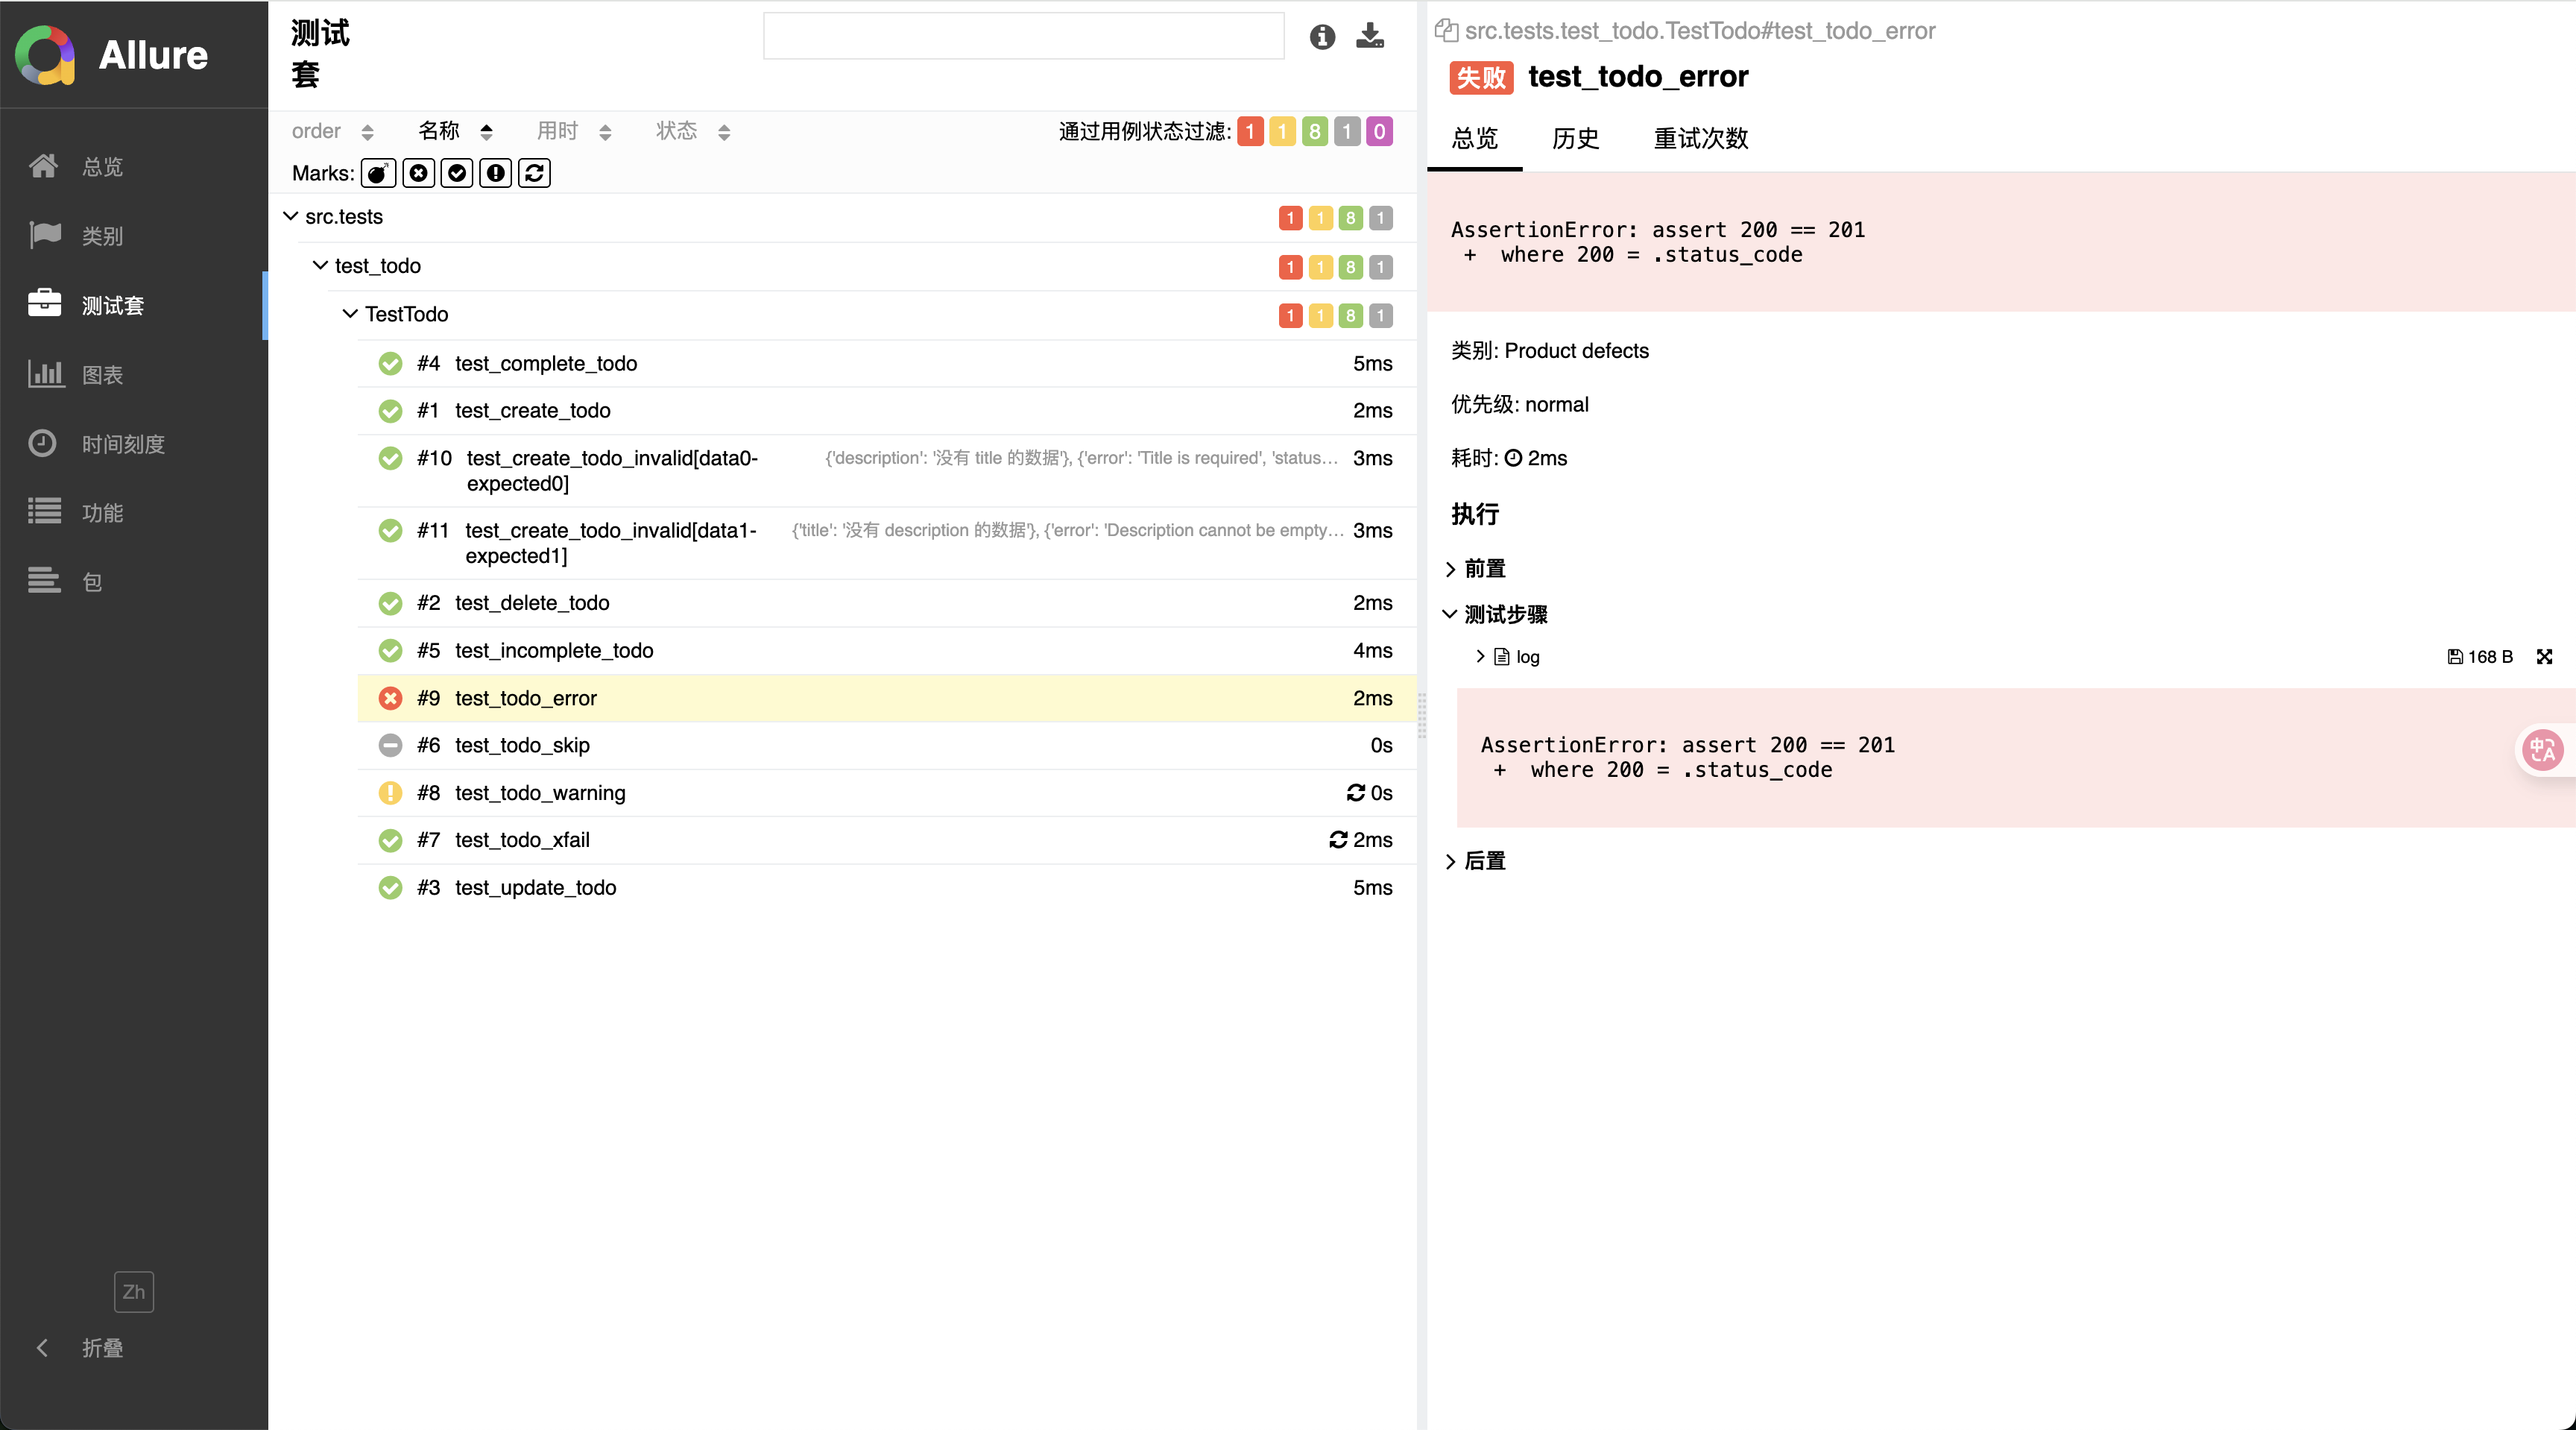
def test_todo_error(self, api_client):
res = api_client.get_todo_list()
# 断言错误在 allure 中是错误用例
assert res.status_code == 201import requests
class TodoAPIClient:
def __init__(self):
self.base_url = 'http://localhost:8080'
self.session = requests.Session()
def get_todo_by_id(self, id):
return requests.get(f"{self.base_url}/todos/{id}")
def get_todo_list(self):
return requests.get(f"{self.base_url}/todos")
def create_todo(self, data):
return requests.post(f"{self.base_url}/todos", json=data)
def update_todo_by_id(self, id, data):
return requests.put(f"{self.base_url}/todos/{id}", json=data)
def delete_todo_by_id(self, id):
return requests.delete(f"{self.base_url}/todos/{id}")
def change_todo_is_done_by_id(self, id, is_done):
api_path = f'/todos/{id}/complete' if not is_done else f'/todos/{id}/incomplete'
return requests.patch(f"{self.base_url}{api_path}")同样使用 pytest 指令运行脚本,只是需要增加一个 --alluredir 参数。后面指定一个目录,allure 会将测试报告生成到这个目录中。
pytest --alluredir allure-results执行后会在当前目录下生成 allure-results 目录,里面是 json | txt 格式的内容。然后使用以下指令,即可在本地启动一个服务,查看测试报告。
allure serve allure-results测试报告会根据当前测试用例的组织方式(目录)生成对应的信息,对于失败和警告的用例也可以查看具体原因。大致如下。
丰富测试报告内容
allure.title
@allure.title('') 可以使用在测试用例以及 fixture 上面。当使用后,会在套件中得到显示。同样支持运行时 api
import allure

@allure.title('')
def test_01():
    pass

def test_02():
    allure.dynamic.title('')
pass对于参数化的测试用例可以使用 format 的方式拿到参数。
@pytest.mark.parametrize('test_input, expected', [(1, 2), (2, 3)])
@allure.title('测试参数化 {test_input}, {expected}')
def test_case_params():
    pass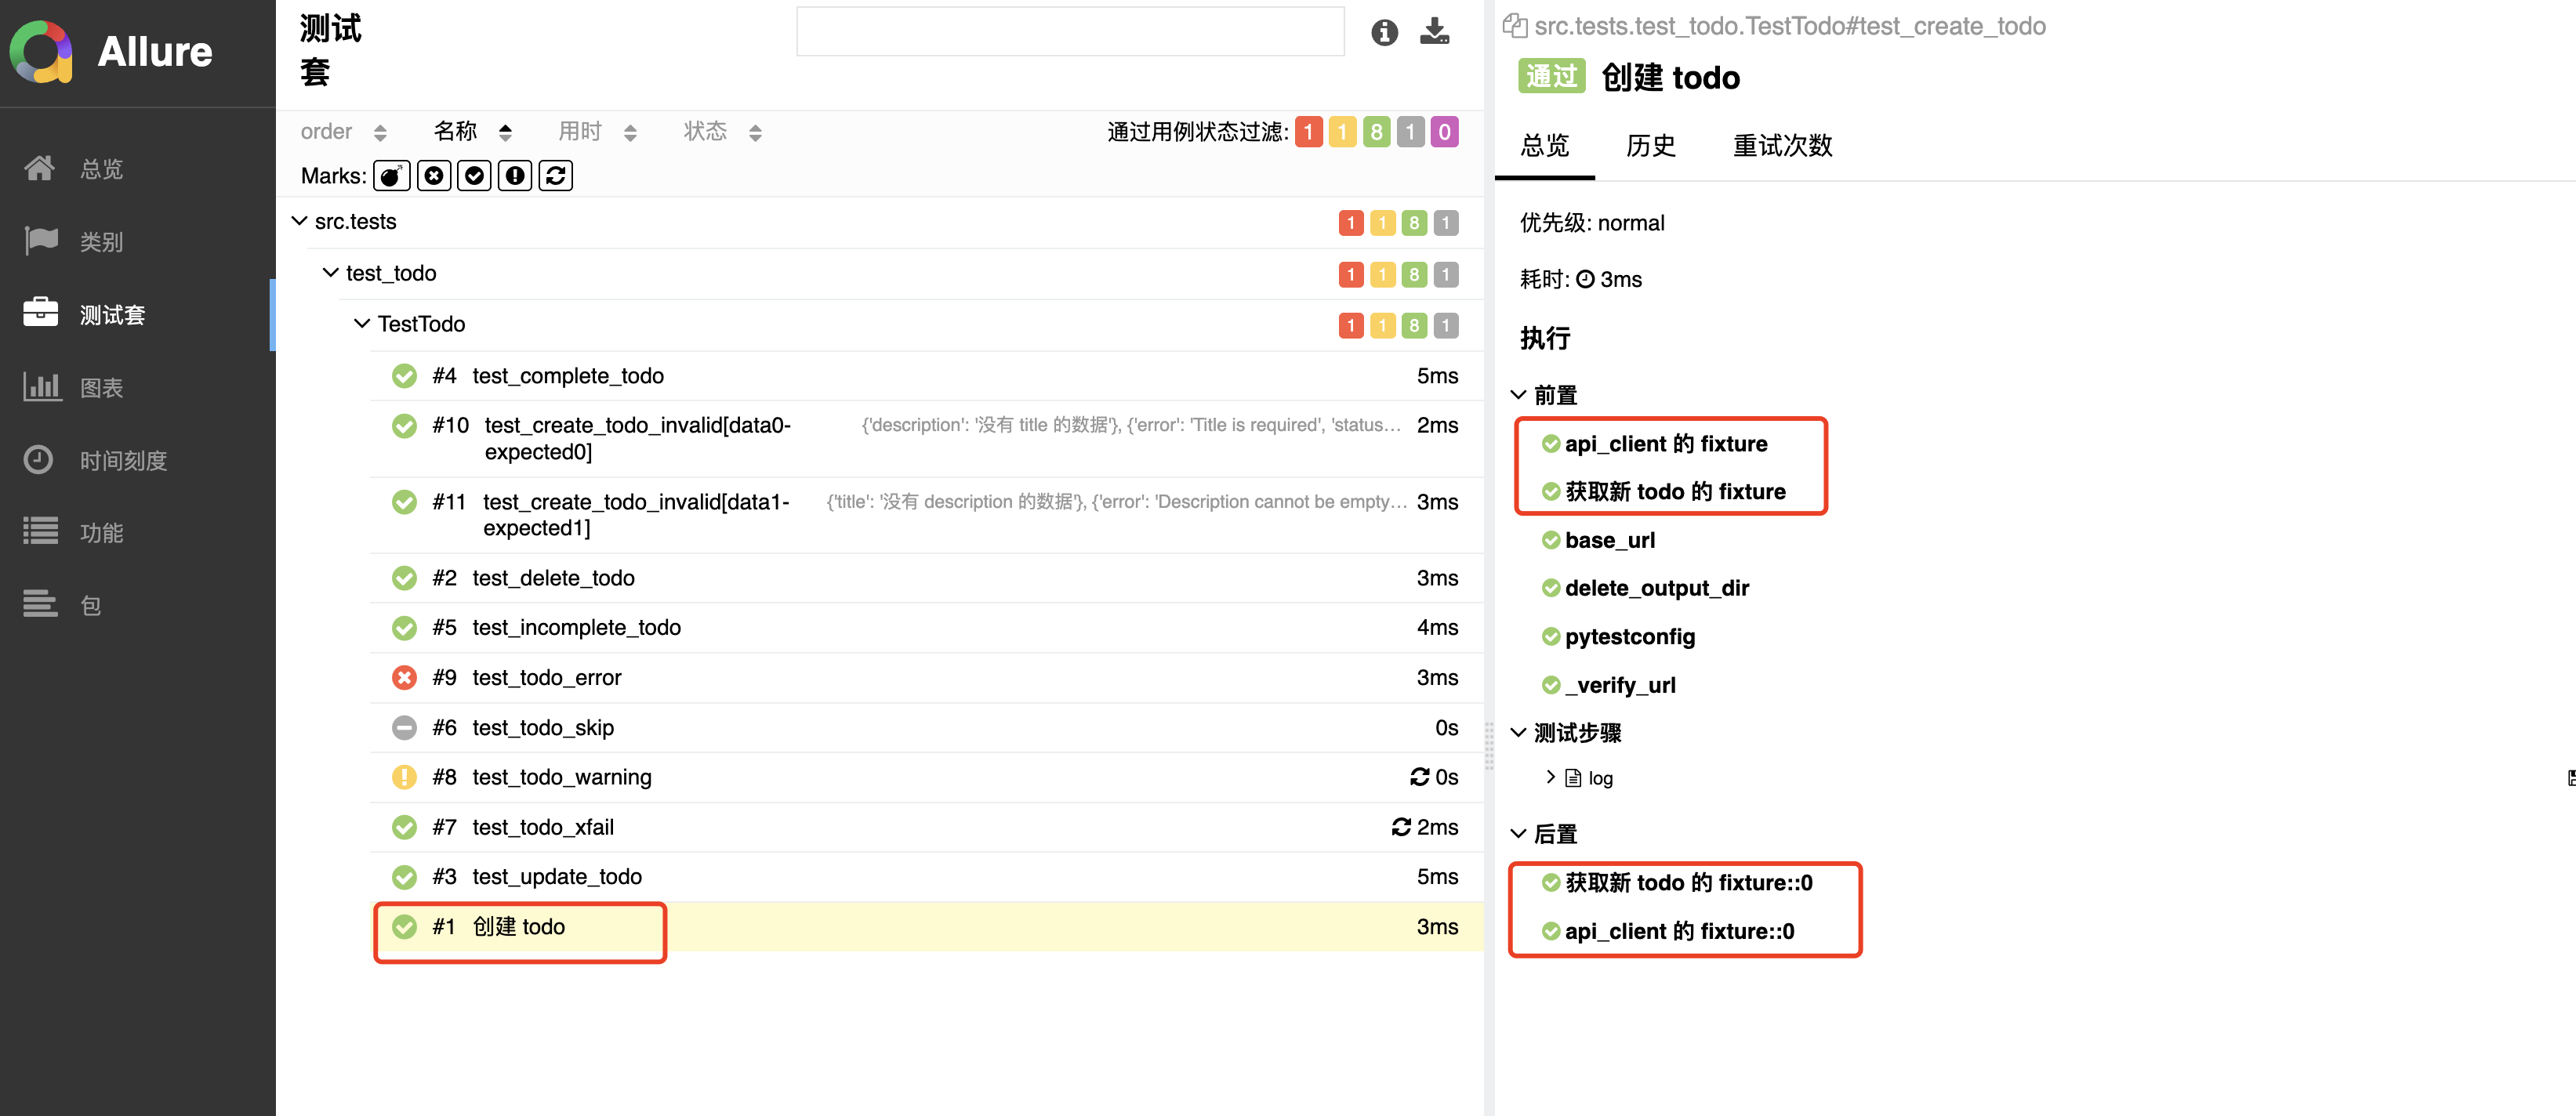
allure.description
@allure.description('') 为测试用例指定描述,支持文档字符串,同样支持运行时 api。
import allure

@allure.description('')
def test_01():
    pass

def test_02():
    allure.dynamic.description('')
    pass

def test_03():
    """ 描述 """
    pass
allure.tag
@allure.tag('', '') 指定一系列的标签,有助于测试用例的分类。支持运行时 api。
import allure

@allure.tag('', '')
def test_01():
    pass

def test_02():
    allure.dynamic.tag('', '')
    pass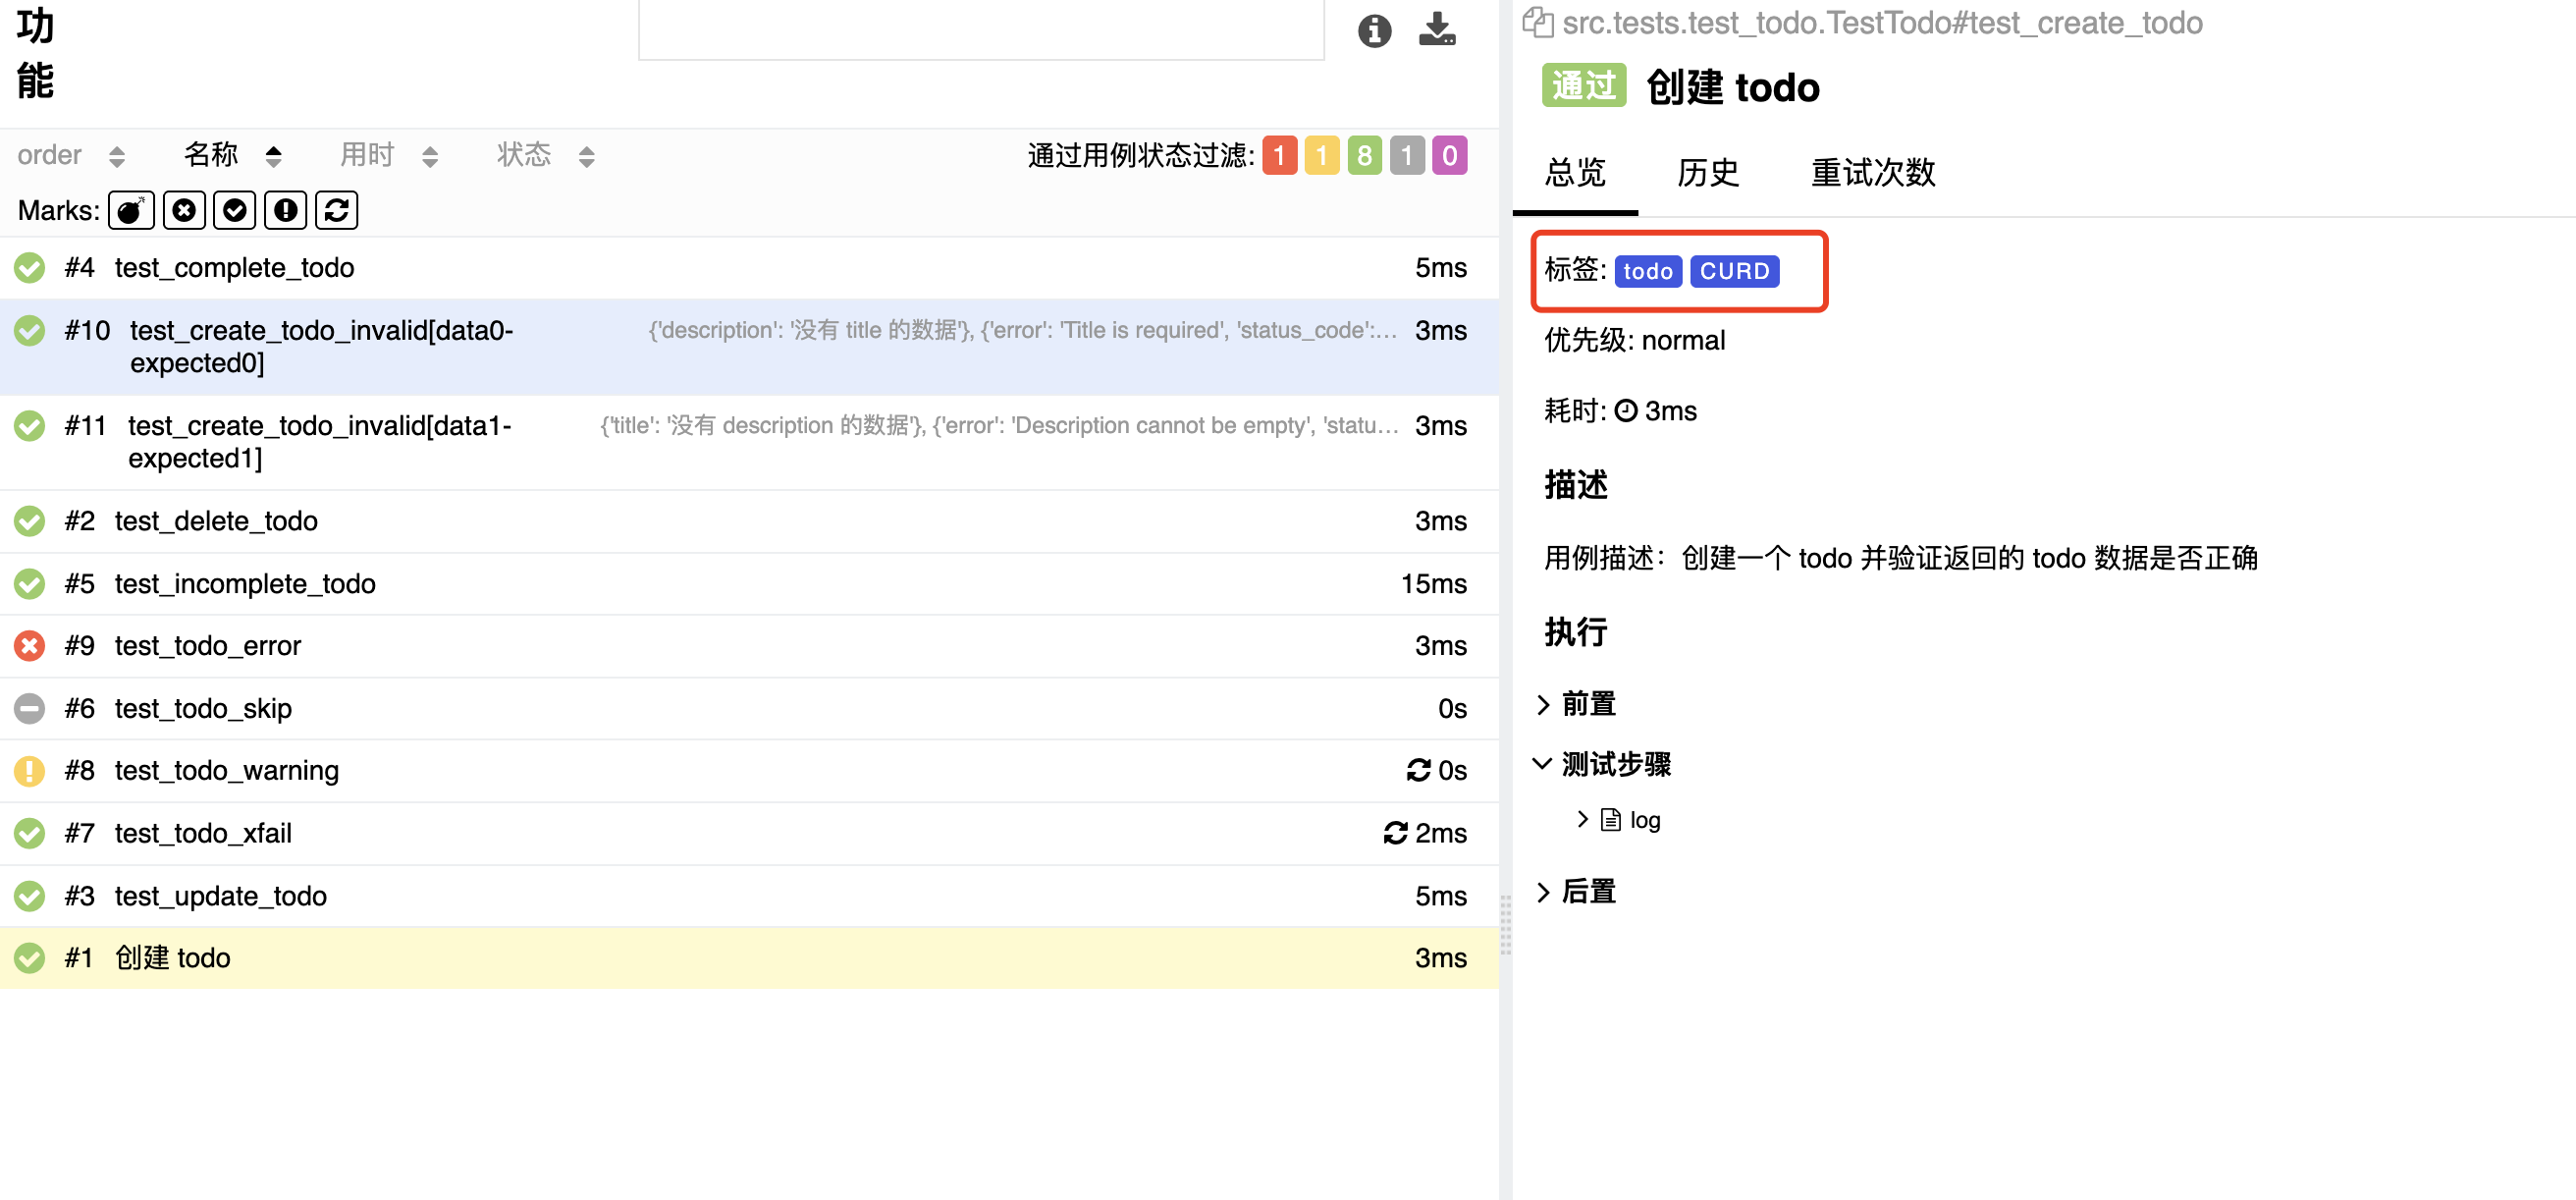
allure.severity
@allure.severity('') 指定测试用例的优先级支持运行时 api。
接收 trivial、minor、normal、critical、blocker。分别对应琐碎、轻微、正常、关键、阻断。默认是 normal
import allure
from allure_commons.types import Severity

@allure.severity(Severity.BLOCKER)
def test_01():
    pass

def test_02():
    allure.dynamic.severity(Severity.NORMAL)
    pass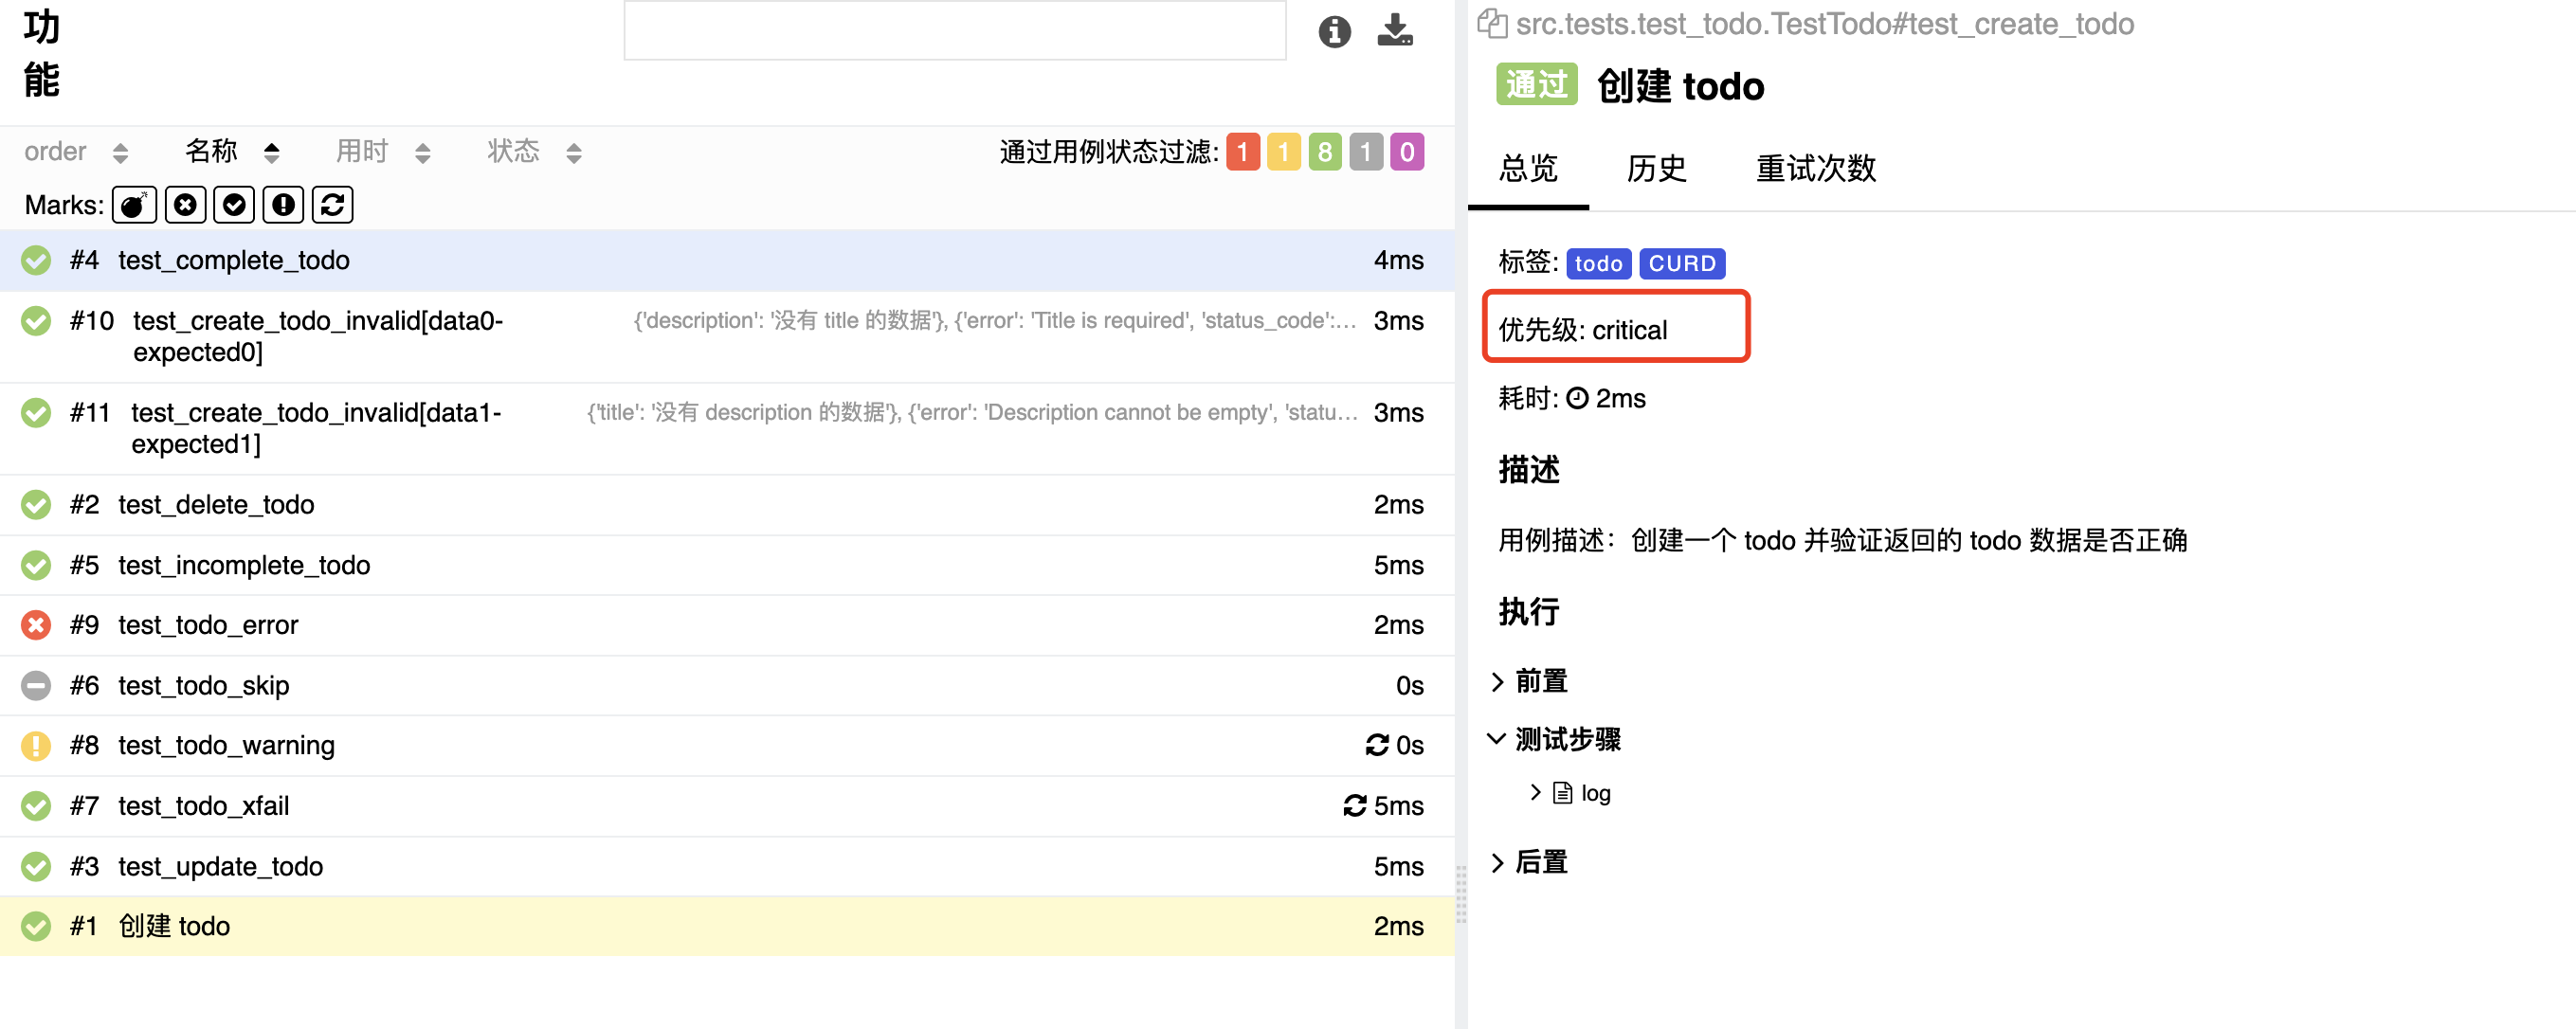
allure.suite
套件分为三个 suite, sub_suite, parent_suite 分别对应自身、子集、父集。一般在类中使用。
分别也对应三个位置,suite 对应当前的文件;sub_suite 对应当前的类;parent_suite 则对应当前文件的父级目录。
import allure

@allure.parent_suite('包含 TODO、等接口测试')
@allure.suite('TODO 接口测试')
@allure.sub_suite('TODO 测试类')
class TestTodo:

    def test_01():
        pass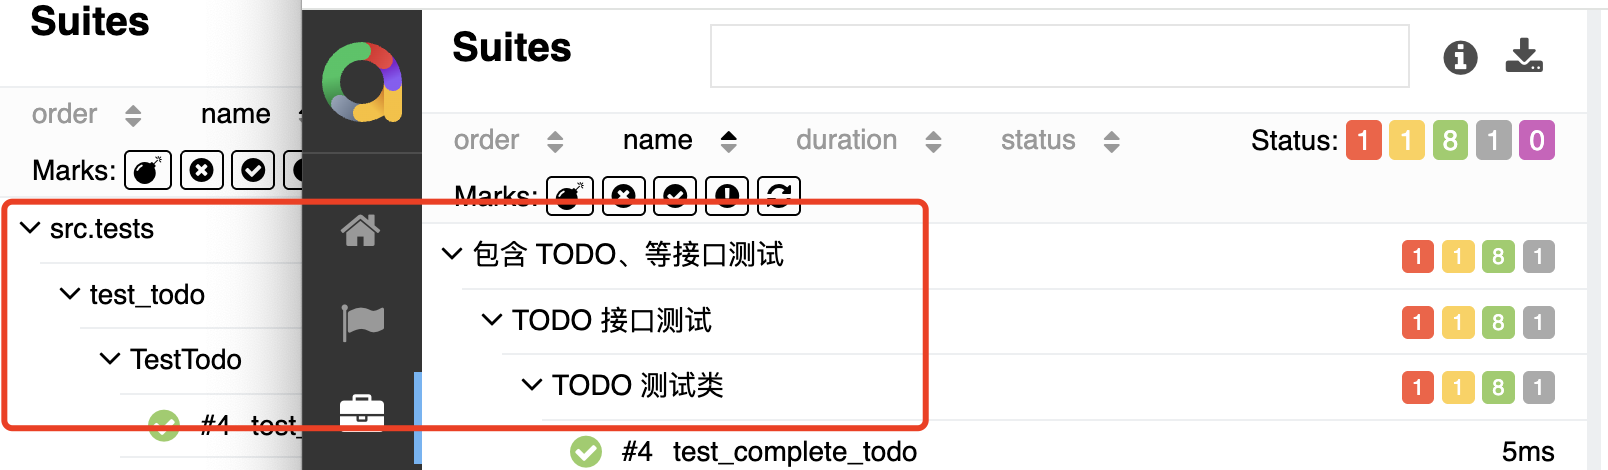
allure.link、issue、testcase
可以指定链接、问题、测试用例。支持运行时 api。
假设你是开源项目或者你的测试用例使用在线托管,这样做可以让你的用例更加明确是在实现什么功能。以及问题和测试用例的对应关系。
import allure

@allure.link(url="测试系统网站链接", name="xx医疗系统")
@allure.issue(url="测试功能问题链接", name="issue-1")
@allure.testcase(url="功能测试用例链接", name="testcase-1")
def test_01():
    pass

def test_02():
    allure.dynamic.link('')
    allure.dynamic.issue('')
    allure.dynamic.testcase('')
pass获取你直接使用 link 传入一个 type,即可实现 issue | testcase 的效果。
import allure
from allure_commons.types import LinkType

@allure.link(url="测试系统网站链接", name="Website", link_type=LinkType.LINK)
@allure.link(url="测试功能问题链接", name="Issue", link_type=LinkType.ISSUE)
@allure.link(url="功能测试用例链接", name="Test Case", link_type=LinkType.TEST_CASE)
def test_01():
    pass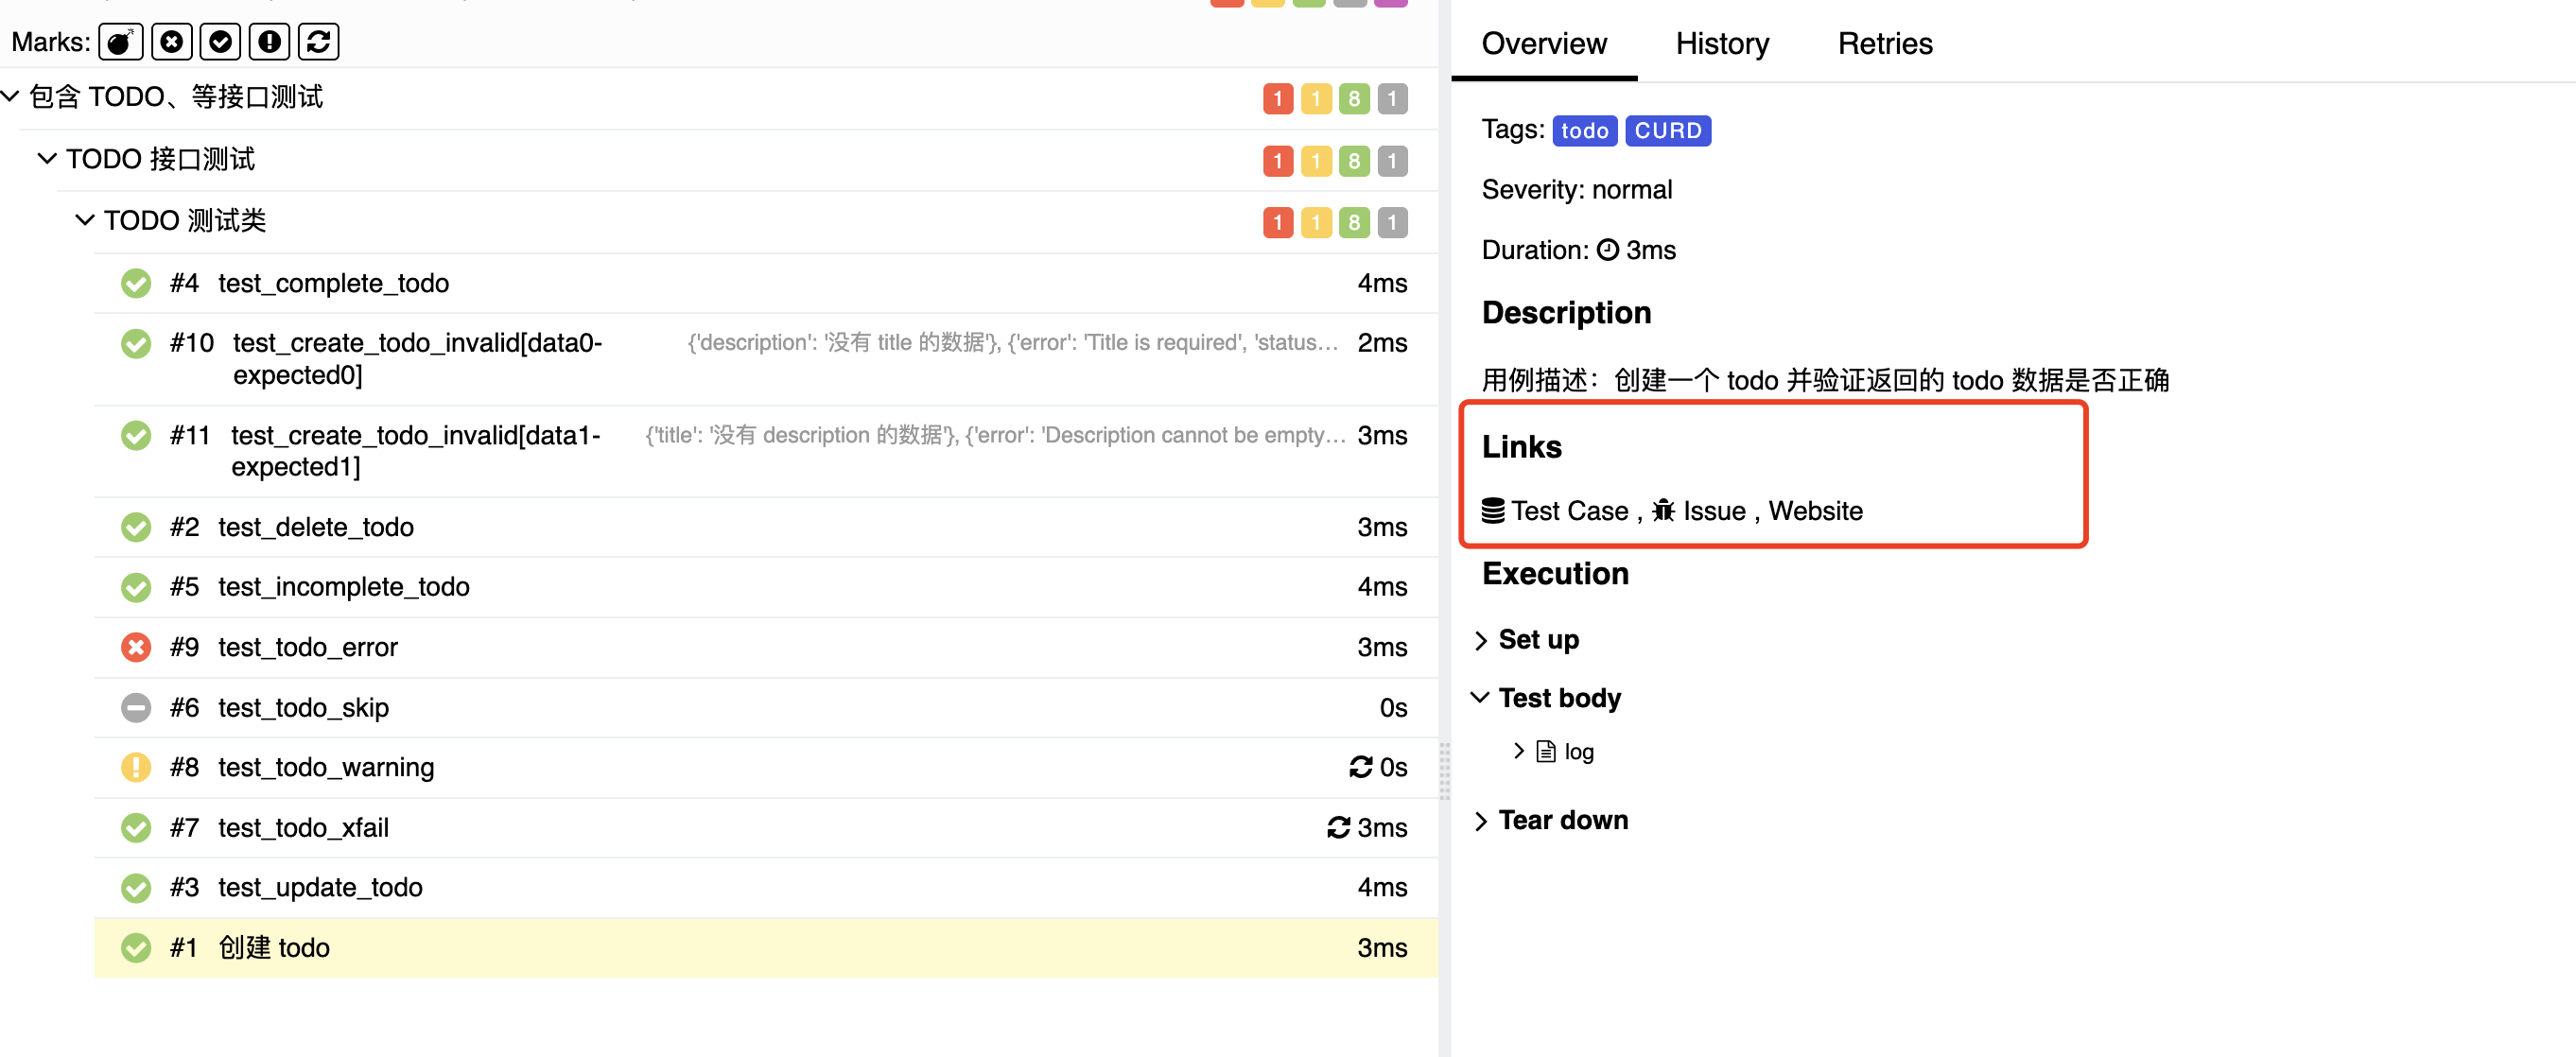
allure.label
label 用于指定标签,支持运行时 api。这是一个语法糖,支持创建很多种的标签。
import allure
from allure_commons.types import LabelType, Severity
# LabelType 的定义
# class LabelType(str):
#     EPIC = 'epic'
#     FEATURE = 'feature'
#     STORY = 'story'
#     PARENT_SUITE = 'parentSuite'
#     SUITE = 'suite'
#     SUB_SUITE = 'subSuite'
#     SEVERITY = 'severity'
#     THREAD = 'thread'
#     HOST = 'host'
#     TAG = 'tag'
#     ID = 'as_id'
#     FRAMEWORK = 'framework'
#     LANGUAGE = 'language'
#     MANUAL = 'ALLURE_MANUAL'

# 比如我定义一个优先级
@allure.label(LabelType.SEVERITY, Severity.BLOCKER)
def test_01():
    pass

# 比如我定义一个 tag
@allure.label(LabelType.TAG, 'test')
def test_02():
pass配置项
allure 的配置同样支持 pytest.ini 和 pyproject.toml。
[pytest]
addopts = --alluredir results_dir
--clean-alluredir[tool.pytest.ini_options]
addopts = [
"--alluredir", "allure-results",
"--clean-alluredir"
]| 参数 | 说明 | 示例 |
|---|---|---|
| --alluredir | 指定生成测试报告的目录 没有则新增 | pytest --alluredir results_dir |
| --clean-alluredir | 新的结果生成之前删除旧的 | pytest --clean-alluredir |
| --allure-severities | 指定优先级 | pytest --allure-severities normal,minor |
| --allure-label | 指定标签 | pytest --allure-labels key=value,... |
label 的 key 支持的参数来源于 LabelType。
项目实战
被测项目 这是一个基于 AI 开发的图书管理系统,后端使用 Python + Flask,前端使用 Vue + ElementPlus。
其中后端使用 docker 启动,前端则是本地启动。具体可以查看该项目的 README.md 文件。
自动化接口测试
自动化接口测试使用 pytest 框架,使用 allure 作为测试报告生成器。地址
内涵接口、UI、以及一些测试脚本。在 src/main.py 下通过 argparse 模块对参数进行解析。实现对不同环境,不同参数的测试。