路由模式、路由创建、组件渲染、导航守卫实现
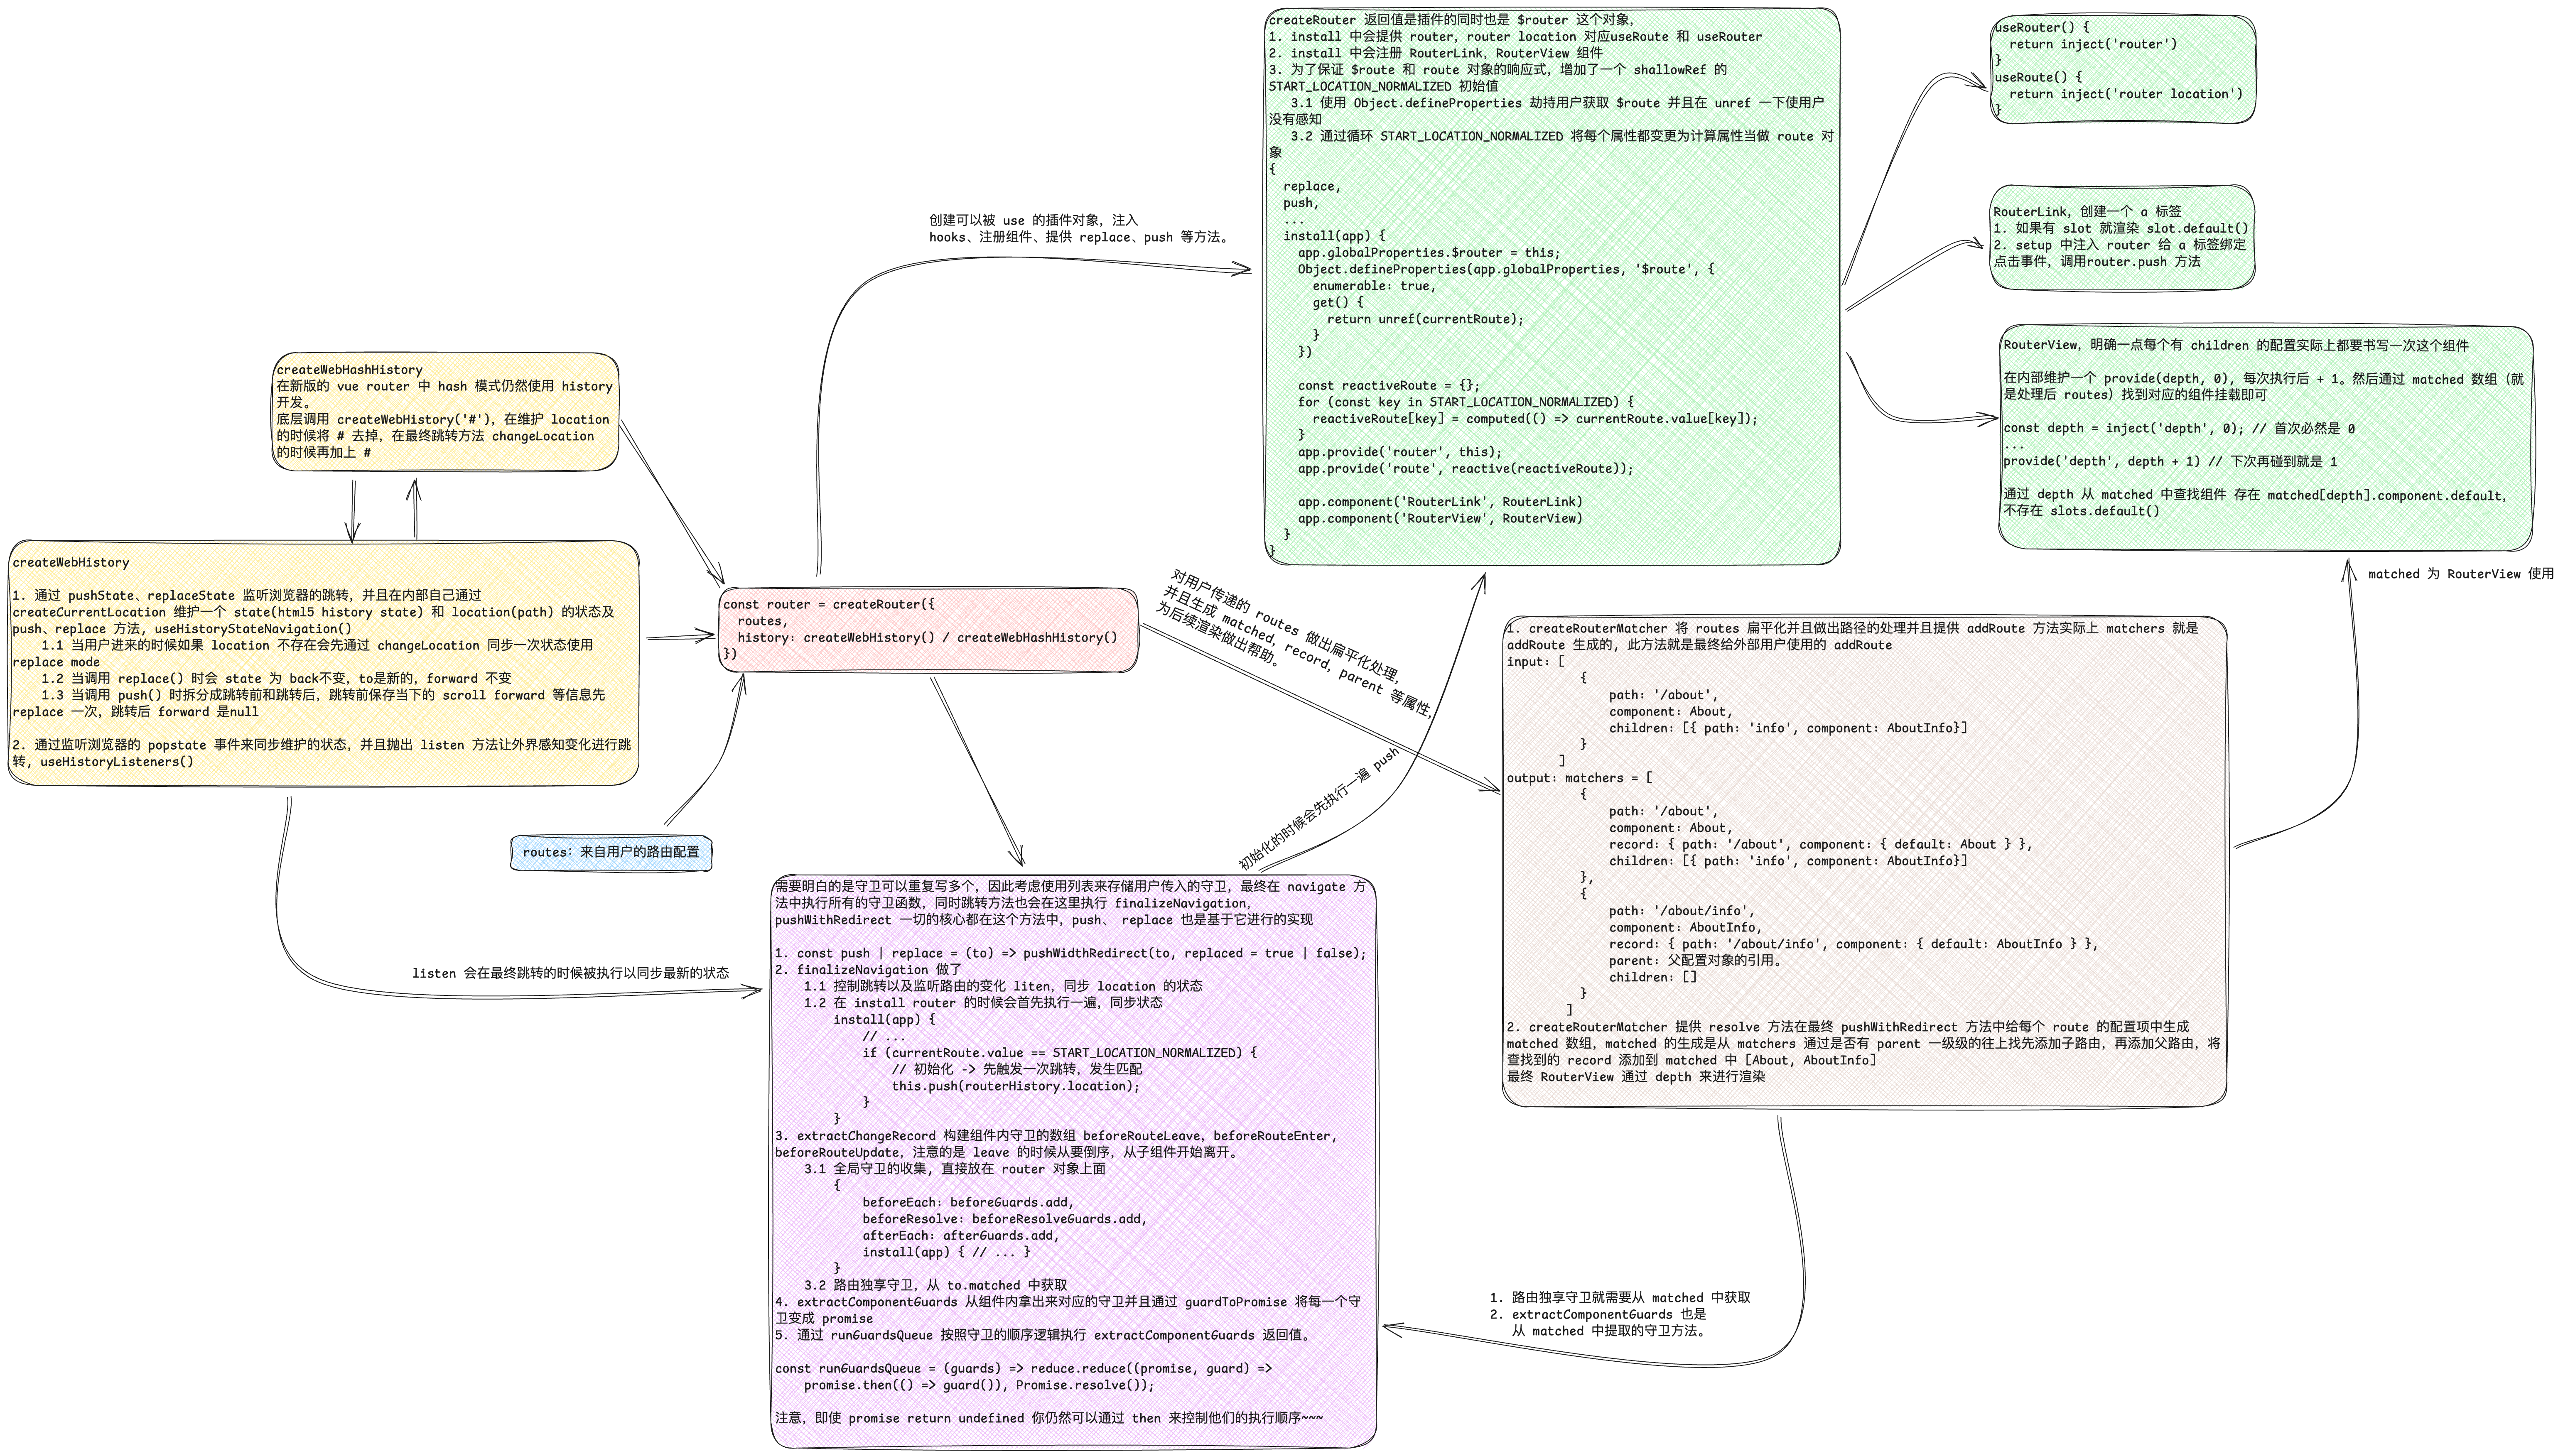
createWebHistory
该方法用于创建一个基于 HTML5 的 history 路由,内部使用 history.pushState 和 history.replaceState 来实现路由的跳转,并且会监听 popstate 事件来实现路由的回退。
在跳转的路由的同时会暴露出两个方法 push 和 replace 来实现路由的跳转。并且会在内部维护两个状态 currentLocation 当前路径和 historyState 当前状态。
/**
 * 从 window.location 中获取 pathname、search、hash 并拼接成当前路径
 * pathname 是 host 后面的路径
 * search 是查询参数 querystring
 */
function createCurrentLocation() {
  const { pathname, search, hash } = window.location;

  return pathname + search + hash;
}

function buildState(back, current, forward, position, replaced = false, computedScroll = null) {
  return {
    back,
    current,
    forward,
    position: window.history.length,
    replaced,
    scroll: computedScroll // 暂时不考虑计算滚动位置
  }
}

/**
 * 构建 historyState 及 currentLocation
 * 暴露 push 和 replace 方法
 */
function useHistoryStateNavigation() {
  const currentLocation = {
    value: createCurrentLocation()
  };
  const historyState = {
    value: window.history.state // 默认情况下是 null
  }

  // 当用户第一次来的时候,先同步一下状态
  if (!historyState.value) {
    changeLocation(
      currentLocation.value,
      {
        back: null,
        current: currentLocation.value,
        forward: null,
        position: window.history.length - 1, // length 默认从 2 开始,因为包含了 pushState 和 replaceState 两个方法
        replaced: true,
        scroll: null
      },
      true
    );
  }

  /**
   * 跳转并且更新状态
   */
  function changeLocation(to, state, replace) {
    window.history[replace ? 'replaceState' : 'pushState'](state, null, to);
    historyState.value = state;
  }

  function replace(to, data) {
    const state = Object.assign(
      {},
      window.history.state,
      // 替换场景:back 是当前路径,to 是新的路径,forward 不变
      buildState(historyState.value.back, to, historyState.value.forward, true),
      data,
      // 替换场景:position 无需更改
      { position: historyState.value.position }
    );
    changeLocation(to, state, true);
    currentLocation.value = to;
  }

  function push(to, data) {
    // push 之前需要考虑将当前页面下的 forward 和 scroll 保存
    const currentState = Object.assign(
      {},
      historyState.value,
      window.history.state,
      {
        forward: to,
        scroll: null // 暂时不考虑计算滚动位置
      }
    );
    // currentState.current 是当前路径 window.history.state.current
    changeLocation(currentState.current, currentState, true);

    // 保存成功之后做真正的 push
    const state = Object.assign(
      {},
      // push 场景:back 是当前路径,to 是新的路径,forward 是 null
      buildState(currentLocation.value, to, null, false),
      { position: currentState.position + 1 }, // 因为 push 之后,position 会加 1
      data
    );

    changeLocation(to, state, false);
    currentLocation.value = to;
  }

  return {
    location: currentLocation,
    state: historyState,
    push,
    replace
  }
}

export function createWebHistory() {
  const historyNavigation = useHistoryStateNavigation();
}目前来看已经可用了,但是浏览器的回退前进按钮是无效的,需要手动监听 popstate 事件来实现。
function useHistoryListeners(historyState, currentLocation, replace) {
  let listeners = [];
  const listen = (fn) => listeners.push(fn);

  const popStateHandler = ({ state }) => {
    // 跳转之后的路径
    const to = createCurrentLocation();
    // 当前位置
    const from = currentLocation.value;
    let isBack = false;

    if (state) {
      // 更新 currentLocation 和 historyState
      currentLocation.value = to;
      historyState.value = state;

      // 大于 0 表示前进,小于 0 表示回退
      isBack = state.position - historyState.value.position < 0;
    }

    listeners.forEach(fn => fn(to, from, { isBack }));
  }

  window.addEventListener('popstate', popStateHandler);

  return { listen };
}

export function createWebHistory() {
  const historyNavigation = useHistoryStateNavigation();
  const historyListeners = useHistoryListeners(
    historyNavigation.state,
    historyNavigation.location,
    historyNavigation.replace
  );

  const routerHistory = Object.assign({}, historyNavigation, historyListeners);

  // 方便用户区域,做一层代理 xx.location 和 xx.state
  Object.defineProperty(routerHistory, 'location', {
    enumerable: true,
    get() {
      return historyNavigation.location.value;
    }
  });
  Object.defineProperty(routerHistory, 'state', {
    enumerable: true,
    get() {
      return historyNavigation.state.value;
    }
  });

  return routerHistory;
}createWebHashHistory
在 Vue Router4 中,createWebHashHistory 和 createWebHistory 的实现方式是一样的,都是基于 HTML5 的 history 路由。
hash 路由的核心实现思想是,调用 createWebHistory 的时候传入 #, 处理 state 的时候将 # 去掉,真正跳转的时候,将 # 加上。
主要逻辑体现在 createCurrentLocation 和 changeLocation 中。
export function createWebHashHistory() {
  // 获取当前路径
  let base = location.pathname + location.search;
  if (!base.includes('#')) {
    base += '#';
  }
  createWebHistory(base);
}改造 createCurrentLocation,如果包含 hash 则返回 hash 后面的路径,否则返回完整路径。
function createCurrentLocation(base = '') {
  const { pathname, search, hash } = window.location;

  const hasPos = base.includes('#');
  if (hasPos) {
    return base.slice(1) || '/';
  }

  return pathname + search + hash;
}改造 changeLocation 跳转的时候把 # 加上。
function changeLocation(to, state, replace) {
  // base 是透传进来的参数
  const hasPos = base.indexOf('#');
  const url = hasPos > -1 ? base + to : to;

  window.history[replace ? 'replaceState' : 'pushState'](state, null, url);
  historyState.value = state;
}createRouter
在工程化的脚本中,一切的开始都是从 createRouter。返回一个插件,最终将 router 挂载到 app 上。
可见在 createRouter 中,做了不少事情,工程中最常用的 RouterView RouterLink addRoute 路由钩子... 都是在这里实现的。
import { createApp } from 'vue';
import { createWebHistory, createRouter } from 'vue-router';

const router = createRouter({
  history: createWebHistory(),
  routes: [
    { path: '/', component: Home },
    { path: '/about', component: About }
  ]
});

createApp(App).use(router).mount('#app');本质上是根据一定的规则去渲染 routes 中的 component,需要一个匹配器去构建 routes 中的父子关系。在渲染的时候,从父到子,依次渲染。在卸载的时候,从子到父,依次卸载。
同时也要去构建 route router hooks ... 方法。
// 初始化路由系统中的默认参数 route 对象的初始化
const START_LOCATION_NORMALIZED = {
  path: '/',
  // params: {},
  // query: {},
  matched: [], // 当前路径匹配到的记录
}

/**
 * options 使用户传入的配置
 */
export function createRouter(options) {
  const matcher = createRouterMatcher(options.routes);
  const routerHistory = options.history;
  const currentRoute = shallowRef(START_LOCATION_NORMALIZED);

  // 不考虑复杂的 to 类型,只考虑 string 类型
  const resolve = (to) => typeof to === 'string' && matcher.resolve(to);

  let ready = false;
  function markAsReady() {
    if (ready) return;
    ready = true;

    routerHistory.listen((to) => {
      const targetLocation = resolve(to);
      const from = currentRoute.value;
      finalizeNavigation(targetLocation, from, true);
    });
  }

  function finalizeNavigation(to, from, replaced = false) {
    if (from === START_LOCATION_NORMALIZED || replaced) {
      routerHistory.replace(to);
    } else {
      routerHistory.push(to);
    }
    currentRoute.value = to; // 更新 currentRoute;
    // 加入监听
    markAsReady();
  }

  /**
   * 处理跳转
   */
  function pushWithRedirect(to) {
    const targetLocation = resolve(to);
    const from = currentRoute.value;
    finalizeNavigation(targetLocation, from);
  }

  const router = {
    push: pushWithRedirect,
    install(app) {
      app.config.globalProperties.$router = this;
      // 对于用户来说每次使用 $route 的时候要考虑 currentRoute 的变化同时要解构出来不可能让用通过 .value 去访问
      Object.defineProperty(app.config.globalProperties, '$route', {
        enumerable: true,
        get() {
          return unref(currentRoute);
        }
      });

      const reactiveRoute = {};
      for (const key in START_LOCATION_NORMALIZED) {
        reactiveRoute[key] = computed(() => currentRoute.value[key]);
      }

      // useRouter 和 useRoute 的实现就是基于这两个 provide
      app.provide('router', this);
      app.provide('router location', reactive(reactiveRoute));

      // import RouterView from RouterView.js / import RouterLink from RouterLink.js
      app.component('RouterView', RouterView);
      app.component('RouterLink', RouterLink);

      // 初始化的时候先进行一次跳转
      if (currentRoute.value == START_LOCATION_NORMALIZED) {
        this.push(routerHistory.location);
      }
    }
  }

  return router;
}createRouterMatcher
createRouterMatcher 主要用于构建路由匹配器,构建父子关系,解析路径,并且拿到所有的组件方便后续渲染。
/**
 * 构建标准的 route 对象
 */
function normalizeRouteRecord(route) {
  return {
    path: route.path,
    name: route.name,
    component: route.component,
    children: route.children || []
  }
}

/**
 * 创建匹配记录,构建父子关系
 */
function createRouteRecordMatcher(normalizedRecord, parent) {
  const matcher = {
    path: normalizedRecord.path,
    name: normalizedRecord.name,
    record: normalizedRecord,
    parent,
    children: []
  };

  if (parent) {
    parent.children.push(matcher);
  }

  return matcher;
}

function createRouterMatcher(routes) {
  const matchers = [];

  /**
   * 该方法就是对外暴露 addRoute 方法
   */
  function addRoute(route, parent) {
    const normalizedRecord = normalizeRouteRecord(route);
    if (parent) {
      /**
       * examples { path: '/home', children: [{ path: 'about' }] }
       * result.path = '/home/about'
       */
      normalizedRecord.path = parent.path + normalizedRecord.path;
    }

    const matcher = createRouteRecordMatcher(normalizedRecord, parent);

    if ('children' in normalizedRecord) {
      const children = normalizedRecord.children;
      for (let i = 0; i < children.length; i++) {
        addRoute(children[i], matcher);
      }
    }
    matchers.push(matcher);
  }

  /**
   * 解析路径,并且拿到所有的组件方便后续渲染, 渲染时直接循环渲染即可。
   */
  function resolve(location) {
    const matched = [];
    let matcher = matchers.find(m => m.path === location);
    while (matcher) {
      matched.unshift(matcher.record);
      matcher = matcher.parent;
    }
    return {
      path: location.path,
      matched,
      // [{path: '/home', component: Home}, {path: '/home/about', component: About}]
    }
  }

  return { addRoute, resolve };
}RouterView 和 RouterLink
渲染一个 a 标签,点击的时候调用 router.push 方法。插槽使用 slots.default 方法。
const RouterLink = {
  name: 'RouterLink',
  props: {
    to: {
      type: String,
      required: true
    }
  },
  setup(props, { slots }) {
    const router = inject('router');

    return () => {
      return h('a', { onClick: () => router.push(props.to) }, slots.default && slots.default());
    }
  }
};

export default RouterLink;const RouterView = {
name: 'RouterView',
setup(props, { slots }) {
const depth = inject('depth', 0);
const route = inject('route location');
const matchedRoute = computed(() => route.matched[depth]);
// 渲染嵌套路由的时候子组件中也要书写 RouterView 组件
// mathched 的结构是 [{path: '/home', component: Home}, {path: '/home/about', component: About}]
// 所以需要提供 depth 来区分是第几层
provide('depth', depth + 1);
return () => {
// setup 只会执行一次,所以需要使用 computed 来监听,在每次 render 的时候再获取一次最新的值
const matchRoute = matchedRoute.value;
const viewComponent = matchRoute && matchRotue.components.default;
if (!viewComponent) {
return slots.default && slots.default();
}
return h(viewComponent);
}
}
};
export default RouterView;useRouter 和 useRoute
本来不想写的,但是还是看看吧。
export const useRouter = () => inject('router');
export const useRoute = () => inject('route location');导航守卫
守卫分为三种形式,全局守卫,路由独享守卫,组件内守卫。对应路由的不同阶段的不同状态。详细
相同的钩子可以注册多个,所以考虑使用数组存储,做个简单的发布订阅。
改造 createRouter 中的 router 对象,添加导航 beforeEach、afterEach、beforeResolve 方法。对应全局前置、后置、解析守卫。
梳理调用链路得知,push -> finalizeNavigation -> 最终的 push,replace 方法。守卫基本上也就在 push 的过程中执行。为了保障执行的顺序通过 promise 链式调用。
const useCallback = () => {
  const handlers = [];
  const add = (fn) => handlers.push(fn);
  // 提供一个只读访问,保证 handlers 的唯一性
  return { add, list: () => handlers };
}

/**
 * 提取出变化的路由记录
 * beforeRouteEnter, beforeRouteUpdate, beforeRouteLeave
 */
function extractChangeRecord(to, from) {
  const leavingRecords = [];
  const enteringRecords = [];
  const updatingRecords = [];

  // 拿到最长的 matched 数组
  const len = Math.max(to.matched.length, from.matched.length);
  for (let i = 0; i < len; i++) {
    const recordFrom = from.matched[i];

    if (recordFrom) {
      // 如果即在 to 中,也在 from 中,则认为是更新
      if (to.matched.find(r => r.path === recordFrom.path)) {
        updatingRecords.push(recordFrom);
      } else {
        // 如果不在 to 中,则认为是离开
        leavingRecords.push(recordFrom);
      }
    }

    const recordTo = to.matched[i];
    if (recordTo) {
      // 如果不在 from 中,则认为是进入
      if (!from.matched.find(r => r.path === recordTo.path)) {
        enteringRecords.push(recordTo);
      }
    }
  }

  return [leavingRecords, updatingRecords, enteringRecords];
}

function guardToPromise(guard, to, from, record) {
  return new Promise((r) => {
    const next = () => r();
    // 执行用户传入的守卫
    const fn = guard.call(record.component, to, from, next);

    // 如果用户传入的是异步的守卫,则需要等待异步守卫执行完毕之后再执行 next
    return Promise.resolve(fn).then(next);
  });
}

/**
 * 提取出组件内的守卫, 并且包装成 promise, 同时支持用户传入同步和异步的守卫, 也为了保证 next 的执行
 */
function extractComponentGuards(records, guardType, to, from) {
  const guards = [];

  for (const record of records) {
    const rawComponent = record.component.default;
    // 从组件的 options 中拿到对应的守卫
    const guard = rawComponent[guardType];
    // 包装成 promise
    guard && guards.push(guardToPromise(guard, to, from, record));
  }
  return guards;
}

export function createRouter(options) {
  const beforeGuards = useCallback();
  const afterGuards = useCallback();
  const beforeResolveGuards = useCallback();

  // 将传入的数组中的每一项都包装成一个 promise,然后依次执行
  const runGuardQueue = (fns) => fns.reduce((promise, fn) => promise.then(() => fn()), Promise.resolve());

  function navigate(to, from) {
    const [leavingRecords, updatingRecords, enteringRecords] = extractChangeRecord(to, from);
    // 提取出离开的路由记录, 离开的时候从子组件开始
    let guards = extractComponentGuards(leavingRecords.reverse(), 'beforeRouteLeave', to, from);

    return runGuardQueue(guards)
      .then(() => {
        // 全局守卫 beforeEach
        guards = [];
        for (const guard of beforeGuards.list()) {
          guards.push(guardToPromise(guard, to, from, guard));
        }
        runGuardQueue(guards);
      })
      .then(() => {
        // 组件内守卫 beforeRouteUpdate
        const guards = extractComponentGuards(updatingRecords, 'beforeRouteUpdate', to, from);
        runGuardQueue(guards);
      })
      .then(() => {
        // 路由独享守卫 beforeEnter
        guards = [];
        for (const record of to.matched) {
          if (record.beforeEnter) {
            guards.push(guardToPromise(record.beforeEnter, to, from, record));
          }
        }
        runGuardQueue(guards);
      })
      .then(() => {
        // 组件内守卫 beforeRouteEnter
        const guards = extractComponentGuards(enteringRecords, 'beforeRouteEnter', to, from);
        runGuardQueue(guards);
      })
      .then(() => {
        // 全局解析守卫 beforeResolve
        guards = [];
        for (const guard of beforeResolveGuards.list()) {
          guards.push(guardToPromise(guard, to, from, guard));
        }
        runGuardQueue(guards);
      });
  }

  function pushWithRedirect(to) {
    const targetLocation = resolve(to);
    const from = currentRoute.value;
    navigate(targetLocation, from)
      .then(() => {
        finalizeNavigation(targetLocation, from);
        // 即使没有 return 也会把 undefined 包装成 promise
      })
      .then(() => {
        // afterEach 全局后置守卫
        for (const guard of afterGuards.list()) {
          guard(to, from);
        }
      });

    // 放弃原有的方案改用 promise 链式调用
    // finalizeNavigation(targetLocation, from);
  }

  const router = {
    // 最终都会通过 add 方法添加到 handlers 中,统一处理
    beforeEach: beforeGuards.add,
    afterEach: afterGuards.add,
    beforeResolve: beforeResolveGuards.add,
    // ...
  }
  return router;
}守卫的核心就是 navigate 方法。将 navigate 包装成 promise 方法支持链式的调用
- 在 finalizeNavigation 的下一个 then 中,执行 afterEach 全局后置守卫
- 通过 runGuardQueue 将钩子全部包装成 promise。
在 navigate 中执行组件内守卫 beforeRouteLeave -> 全局前置守卫 beforeEach -> 组件内守卫 beforeRouteUpdate -> 路由独享守卫 beforeEnter -> 组件内守卫 beforeRouteEnter -> 全局解析守卫 beforeResolve